
Essential Tips for Measuring Your Kitchen Area for a Perfect Design
- Charlotte Cabinet Installation

- Jan 3
- 6 min read
Designing your kitchen is both exciting and challenging. Accurate measurements of your kitchen space are critical for a successful design. They ensure everything fits well and works for your needs. This guide offers essential tips to help you measure your kitchen area effectively, leading to the perfect design.
Why Accurate Measurements Matter
Accurate measurements can mean the difference between a dream kitchen and a design disaster. An error as small as an inch can lead to:
Poor Layout: Inefficient use of space can make your kitchen feel cramped or disorganized.
Inadequate Storage: Misjudging dimensions can result in cabinets that don’t hold all your kitchen items.
Inefficient Workflow: A poorly planned kitchen can disrupt your cooking experience.
According to a study by the National Kitchen and Bath Association, over 50% of homeowners report that a lack of storage was their biggest regret. Avoid these pitfalls by measuring correctly from the start.
Essential Tools for Measuring
To get started, gather these tools to help you measure accurately:
Measuring Tape or laser measure: A flexible tape is best for both straight and curved surfaces. The tape is the classic choice — reliable, easy to use. On the other hand, the laser measure offers quick and precise readings. Go with what feels right; just remember, measuring twice (or thrice) is always better than regretting your choices later!
Notepad and Pen: Document your measurements and any important notes on the layout.
Level: This ensures your measurements are straight, and a straight edge can help you draw out layouts like a professional.
Preparing Your Kitchen for Measurement
Before you start measuring, make sure to clear the area. Take away small appliances, clutter, and anything that might lead to an "Oh wow, I forgot that was there!" moment. The goal is to create a clear path. With a tidy area, you're set to handle those measurements like an expert.
Steps for Measuring Your Kitchen Area
1. Measure the Walls
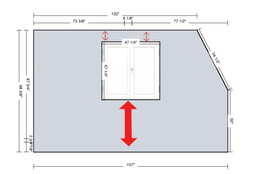
Start by measuring the length of each wall. Use your measuring tape to find the distance from corner to corner. Pay attention to unique features like projecting walls or recesses, as they can impact your design.

2. Measure Doorways and Windows
Next, measure the height and width of all doorways and windows. Don’t neglect to record the distance from the floor to the bottom of the window. For example, if your kitchen window is 36 inches wide and 48 inches tall, note these dimensions precisely.


When measuring a window with trim, ensure to include the trim dimensions to achieve accurate measurements.
To measure a door, begin by measuring the width at the top, middle, and bottom of the door frame, and take the smallest measurement. Then, measure the height at the left, center, and right of the frame, using the smallest measurement. Finally, measure the thickness of the door slab.


When measuring a door with trim, ensure to include the trim dimensions to achieve accurate measurements.
3. Measure the Floor Space
After measuring the walls, assess the kitchen floor size. Measure the total length and width while noting any significant obstacles. If you have a central island that is 60 inches long and 24 inches wide, include these dimensions in your notes.
Measure the distance from the back wall to the point where you want the cabinets to conclude. Standard depths for cabinets are generally 24 inches for base cabinets and 12 inches for upper cabinets, but confirm this with the specific cabinet options you have.
4. Measure the Ceiling Height
Check the ceiling height, especially if you plan to install wall cabinets, stacked cabinets, and particularly scribe molding.
Measure at various points; rooms can sometimes have uneven ceilings.
For instance, if your ceiling height varies between 8 to 10 feet, note those details.

5. Identify Fixed Features
Take note of fixed installations such as plumbing fixtures, electrical outlets, and heating vents. For example, if your kitchen has a sink positioned 36 inches from the floor, this will influence your design significantly.


Take into considerations
Standard Kitchen Cabinet Dimensions: Kitchen cabinets come in standard sizes, usually 24 inches deep and varying in height (30 to 36 inches, typically). Knowing these dimensions helps you plan your layout effectively. Mix and match those heights and depths to strike the perfect balance of style and function.
Countertop Height and Depth: Countertops are where all the magic happens, so their height and depth matter. Most countertops sit around 36 inches high, but if you're on the taller side, consider adjusting. Depth usually hovers around 25 to 26 inches, allowing for plenty of prep space. Get this measurement right, and it’ll be more comfortable when you’re whipping up your next culinary masterpiece (or just making toast).
Space Requirements for Appliances: Don’t forget to account for the space appliances need for both functionality and ventilation! Refrigerators usually need at least an inch of air on each side, while ovens and dishwashers require specific clearances. Make sure to check the specs and give your appliances space to breathe.
Common Mistakes to Avoid When Measuring
Measuring only once: Always measure at least twice (three times if walls look questionable). Old homes in particular are rarely square or straight.
Assuming walls are perfectly straight or square: They almost never are.
✔ Measure top, middle, and bottom of each wall
✔ Use the smallest measurement when planning cabinet sizes
Forgetting ceiling height variations
Ceilings can slope or dip. Measure ceiling height at multiple points, especially if installing:
✔ Tall pantry cabinets
✔ Cabinets to the ceiling
✔ Crown molding
Ignoring floor level: An uneven floor can throw off base cabinets big time.
✔ Check floor level along all cabinet runs
✔ Always measure from the highest point of the floor
Not accounting for appliances. A classic mistake. You must confirm:
✔ Appliances widths, heights, and depths
✔ Required clearances (dishwasher, fridge doors, oven swings)
✔ Whether appliances are counter-depth or standard. Never assume “standard size.”
Overlooking fillers and clearances. You’ll need space for:
✔ Door and drawer swings near walls
✔ Fridge doors opening fully
✔ Corner cabinet functionality
Skipping fillers can lead to cabinets that technically fit but don’t function.
Forgetting plumbing, electrical, and vents. Measure and note:
✔ Sink plumbing location. Electrical outlets and switches. Gas lines and hood vents.
Cabinets may need modifications or spacing to avoid conflicts.
Measuring to trim instead of the wall. Always measure wall to wall, not to baseboards, crown, or window trim. Trim can be removed; walls don’t move.
Not noting window and door details. Include:
✔ Window height from floor. Window width and casing depth
✔ Door swings and casing thickness
This is critical for uppers and sink base placement.
Forgetting countertop overhangs. Base cabinets aren’t the final edge—countertops extend. Typically 1–1½ inches, missing this can affect appliance alignment and walkways.
Pro tip (installer mindset )
✔ When in doubt, leave room to adjust. It’s easier to add fillers than to cut cabinets on-site.
Tips to Ensure Precision
Double-Check Your Measurements
Double-checking your measurements is a smart move. Measure each wall, window, and doorway multiple times, aiming for at least three checks. This will minimize errors and give you confidence in your data.
Use a Helper
Having a friend or family member assist you can make the measuring process smoother. It helps you cover longer distances and ensures that you have someone to help hold the measuring tape for more accurate readings.
Consider a Laser Measure
For those seeking precision, a laser measure can save time and provide accurate results quickly. Many models allow you to measure distances up to 100 feet, making them perfect for larger kitchens.


6. Create a Rough Sketch
As you measure, draw a quick layout of your kitchen. This sketch doesn’t have to be perfect, but it’s helpful to see the entire space, including dimensions and fixed features, at a glance.


Wrapping Up Your Kitchen Project
Accurate measurements are crucial for your kitchen design journey. By following these outlined tips, you can capture the precise dimensions you need to create a kitchen that’s not just beautiful but also functional. Take your time, verify your measurements, and consider your needs as you move forward. With careful planning and attention to detail, your perfect kitchen design is on the horizon.

What's next? Planning Your Kitchen Design
Stay tuned! We're preparing a guide to help you design your kitchen cabinets, whether using graph paper or design software.


Great tips. Thanks for sharing your expertise!